Engraved componentry is a hallmark of classic bike styling and reflects a simpler time when component vendors were much likelier to be the actual manufacturers than they are today. Printed and, later, laser etching began to arise in the 80's when many manufacturers began offering "white label" services to all comers.
These days, practically anyone can have their own component "brand" simply by ringing up an offshored manufacturer, select the component, email them the logo art, and pay for the minimum order.
This is almost as easy as getting t-shirts printed and sometimes I half in jest consider a line of "Fuji Otaku" headsets.
But another nice point about engravings/casting marks is that they can be painted. As long-time readers are aware, I do this from time to time, and occasionally I get messages asking for advice on methodology.
Recently, I had a private message dialogue on Bikeforums.com on this topic and am posting it here in slightly edited form for reference purposes:
"Hi Fuji Otaku
Sorry to be a bother, I wanted to ask for pointers on painting details like you did with your VX derailleur. I am trying to paint the front of a Suntour VGT luxe using the fill and wipe method but I'm not seeing the results you did. Would you mind sharing some tips?
Matt"
"Hi Matt,
For the fill, I broadly use two things. One is sharpie paint pens, the other is brush/paint. With the sharpie paint pen, you almost need no wipe, it is pretty accurate, but if you do, alcohol is actually better than paint remover for that stuff. Takes it right off, even after long dry.
With brushed paint, I like to let it dry for a while, to the point it really isn't smeary any more, but still a little soft. This can be anywhere from an hour to 1/2 day, really depends on a lot of factors like heat, paint thickness, etc. Then I do a wipe with a popsicle stick, really sort of scraping off the excess with a "sharp" edge of the popsicle stick. I tend to moisten the popsicle stick in mineral spirits/paint thinner so it is moist, but not dripping.
This scrape off method works best if the area that paint is being removed from is polished, otherwise paint tends to stay in scratches, pores, recessed areas. Actually, if the item is really highly polished, it comes off very easily and you don't have to be so careful about dry time.
If the piece doesn't have anything meltable, like a crankarm, and my wife isn't around, I'll throw it in the oven for a while at around 250-300 degrees to bake it on a little. I don't know if this helps, but it doesn't seem to have hurt anything.
Another note on brushing large areas, like seatpost flutes - I go for one coat, liberally filling rather than brushing on thin coats. One very thick coat, really not even brushing more than just using the brush to transfer paint from the can to the component and hope that gravity makes it self level. This tends to leave a glossy surface with no brush marks.
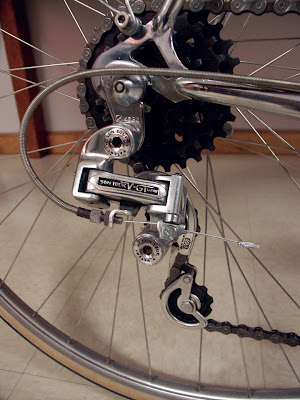
IIRC, I did the derailleurs with paint pen, not brush. The paint pen works really well for small detail areas. My impression is that it is not as durable as brush on paint, but for small recessed areas this isn't a worry.
Doing the letters on derailleur bolts and other very fine engravings is tricky - it is hard to avoid taking all the paint off during the wipe. All I can say to that is you have to experiment w/how heavy you lay it on. When I did that part, I did use a paint pen and then rubbing w/a popsicle stick w/mineral spirits.
Fuji Otaku"
"Fuji Otaku,
Thank you very much for the painting tips. I tried a few of the techniques out this afternoon and got much better results. I used a razor blade to remove the excess paint away on the bolts and other shallow areas. I wanted to mention that I enjoy your blog too. I meant to leave a comment on one of the articles but didn't for some reason.
Matt"
"Matt,
Glad to help. Hope you post some pics.
Fuji Otaku"
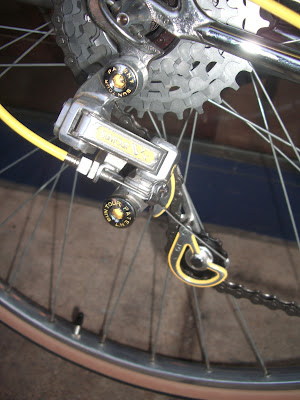
"Fuji Otaku,
Here is a picture of it. I wouldn't call it perfect, the front was difficult with the tiny letters in "luxe". I also did the painting while it was mounted on the bike so that added a but of unneeded difficulty. I am still pretty happy with the look of it, I can always remove the paint if I want to later.
These VGT derailleurs are some of my favorites. I love the massive look of them for some reason. They make me think of a VX that has been abusing steroids.
Matt"
"Matt
That looks terrific, so much that maybe I'll do one up for my new Fuji America. I agree w/you, the V-GT derailleurs are pretty buff looking, and have the added benefit of being virtually indestructible.
Fuji Otaku"
So there we have it folks. In my opinion, this type of detailing can add a bit of elegance and personalization while being easily reversible. It is also incremental - Matt could just stop at the derailleur, and it is nice, actually looks like something that could have come from the factory. The other extreme are like high end Colnagos and other 80's eurobikes with every engraving, both factory and pantographed, and allen recess filled in multi-colored hues.
Me, I'm hoping to see more of this in the inbox, both from Matt and other readers who may be into this sort of treatment.
1 comment:
In the 90s, I would always fill the recessed "S" on Specialized stems with red paint, for good customers. I actually had a couple of guys complain that their stems were overlooked by the factory because the "S" wasn't red, like their buddy's was.
Post a Comment